Quick Start
The purpose of Quick Start is to help you build a very simple HTML5 web application and deploy it inside the DronaHQ Client App container. This helps developers establish a basic foundation for developing and deploying apps on the DronaHQ platform.
As mentioned before, in the DronaHQ SDK Overview guide, then DronaHQ platform’s SDK consists of two major segments:
- Device APIs
- REST APIs.
While DronaHQ Rest APIs are to be consumed via HTTP requests, using the Device APIs requires your application to include dronahq.js in the header section of your HTML page.
<script src="js/dronahq.js"></script>
You can get the latest copy of dronahq.js from our GitHub repository, and place it anywhere in your application’s resources.
The following properties allow you to detect what platform your micro-app is running on, if you need to add platform specific features/content in your micro-app.
- DronaHQ.onIos: returns true if the micro-app is running inside DronaHQ container on iOS.
- DronaHQ.onAndroid: returns true if micro-app is running inside DronaHQ container on Android.
- DronaHQ.onWindowsPhone: returns true if micro-app is running inside DronaHQ container on Windows Phone.
- DronaHQ.onWeb: returns true if micro-app is running inside DronaHQ Web App on an HTML5 compliant browser.
Note that the DronaHQ Client must be fully initialized before making any Device API calls.
document.addEventListener('deviceready', function(){
        //Intialize your app
}, false);
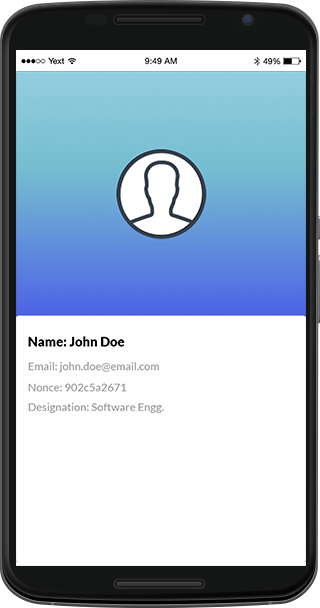
With this in mind, lets start by making a simple application that displays the details of on signed-in user.
Steps to Build
You can follow the steps mentioned below or get the source code from the github repository.
- Step 1: Create the app project folder “the-user-sso”. This will be the application’s root directory.
- Step 2: Add index.html, the web page that hosts the application, to the application’s root directory.
<!DOCTYPE html>
<html xmlns="http://www.w3.org/1999/xhtml">
        <head>
                <title>User profile - DronaHQ</title>
                <meta name="viewport" content="width=device-width, initial-scale=1, maximum-scale=1" />
                <link rel="stylesheet" href="css/semantic.min.css" type="text/css" />
                <link rel="stylesheet" href="css/app.css" type="text/css" />
        </head>
        <body>
                <div class="ui card">
                        <div id="top">
                                <div class="image">
                                        <img id="imgUserProfile" src="" />
                                </div>
                        </div>
                        <div id="bottom">
                                <div class="ui card centered user-profile">
                                        <div class="content">
                                                <div class="header meta padding-t-10">
                                                        Name: <span id="spUserName" class="">{{user_name}}</span>
                                                </div>
                                                <div class="meta padding-t-10">
                                                        Email: <span id="spUserEmail" class="email">{{user_email}}</span>
                                                </div>
                                                <div class="meta padding-t-10">
                                                        Nonce: <span id="spUserNonce">{{nonce}}</span>
                                                </div>
                                                <div id="userDesg" class="meta padding-t-10 hide">
                                                        Designation: <span id="spUserDesg">{{user_desig}}</span>
                                                </div>
                                        </div>
                                </div>
                        </div>
                </div>
        <script src="js/vendor/dronahq.js"></script>
        <script src="js/vendor/jquery.min.js"></script>
        <script src="js/vendor/semantic.min.js"></script>
        <script src="js/vendor/pnglib.js"></script>
        <script src="js/vendor/identicon.js"></script>

        <!-- App -->
        <script src="js/app.js"></script>
        </body>
</html>
Step 3: Add the directories named ‘js’ and ‘css’ to the application’s root directory. These will contain all your javascript files and style-sheets respectively.
- Add app.js in the directory ‘js’
/* global $, DronaHQ, Identicon */

var App = function () {
        var _getDefaultImage = function (inputHash) {
                // set up options
                var hash = 'myUnicodeUsername!' // Any unicode string
                var options = {
                        background: [255, 255, 255, 255], // rgba white
                        margin: 0.2, // 20% margin
                        size: 290 // 420px square
                }

                // create a base64 encoded PNG
                var data = new Identicon(hash, options).toString()

                return 'data:image/png;base64, ' + data;
        }

        var _initUser = function () {
                DronaHQ.user.getProfile(function (uData) {
                        console.log('User ID: ' + uData.uid)
                        $('#spUserName').text(uData.name)
                        $('#spUserEmail').text(uData.email)
                        if (uData.designation) {
                                $('#userDesg').removeClass('hide')
                                $('#spUserDesg').text(uData.designation)
                        }
                        if (uData.profile_image) {
                                $('#imgUserProfile').attr('src', uData.profile_image)
                        } else {
                                $('#imgUserProfile').attr('src', _getDefaultImage(uData.uid))
                        }
                        $('#spUserNonce').text(uData.nonce)
                })
        }

        return {
                init: function () {
                        _initUser()
                }
        }
}

$(document).on('deviceready', function () {
        var objApp = new App()
        objApp.init()
})
- Step 4: Include all files in the application’s root directory to a .ZIP file.
- Step 5: Deploy your application as a .ZIP package named “MyQS”.
Now open the client app, and on the homescreen a micro-app icon named “MyQS” would be available. Click the micro-app to view your application.
You can also get started by trying out more of our sample applications.